|
|
SophiaFramework UNIVERSE 5.3 |
In the responder system, there are several important elements: state of valid/visible/active/enable/focus, region, parent-child relationship, sibling relationship, event, tracer, handler, etc.
These elements common to all responders (GUI components) are defined and implemented in the SFYResponder class.
In this section, the elements that constitute the responder system are described.
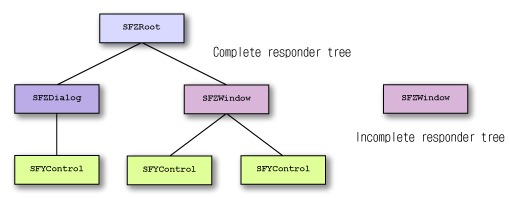
The responder tree is the structure for managing the responders. The responder located at the top of the responder tree is called "root responder".
The responder tree is drawn on the device screen in the following order relation:
![[Tip]](images/tip.png) |
SFYResponder::ToFront function |
|---|---|
If the SFYResponder::ToFront function of a window is called, not only the window but also its child responders such as a button or a label will be moved foremost together. | |
Example 9.4. Making the responder tree
SFCError USRApplication::MakeTree(Void)
{
    SFZRootSmp root;
    SFZDialogSmp dialog;
    SFZTextButtonControlSmp button;
    SFZWindowSmp window;
    SFZTextLabelControlSmp label;
    SFCError error(SFERR_NO_ERROR);

    // get the root which the SFYApplication class contains by default
    if ((root = GetThis() != null) {

        if ((dialog = SFZDialog::NewInstance(&error)) != null) {

            if ((error = dialog->SetParent(root)) == SFERR_NO_ERROR) {

                if ((button = SFZTextButtonControl::NewInstance(&error)) != null) {

                    if ((error = button->SetParent(dialog)) == SFERR_NO_ERROR) {

                        ...
                    }
                }
            }
        }

        if (error == SFERR_NO_ERROR) {

            if ((window = SFZWindow::NewInstance(&error)) != null) {

                if ((error = window->SetParent(root)) == SFERR_NO_ERROR) {

                    if ((label = SFZTextLabelControl::NewInstance(&error)) != null) {

                        if ((error = label->SetParent(window)) == SFERR_NO_ERROR) {

                            ...
                        }
                    }
                }
            }
        }
    }

    return error;
}
![[Caution]](images/caution.png) |
CAUTION |
|---|---|
SFYApplication contains the default root(SFZRoot) internally as a result of the processing of the SFYApplication::SFYApplication constructor. | |
The root responder is located at the top position of the responder tree.
If the root responder is bound with the distributer and the renderer, each responder of the responder tree can receive the events and draw itself on the device screen. And, the valid states of the responders in the responder tree will become ON.
![[Note]](images/note.png) |
Note |
|---|---|
|
In general, the root(SFZRoot) is used as the root responder. A responder such as a window or a control is temporarily the root responder after its creation until it is connected to the responder tree since it has no parent responder. However, no responder other than the root is used as the root responder bound with the distributer and the renderer. | |
Example 9.5. Binding the root responder with the distributer and the renderer
SFCError USRApplication::MakeRoot(Void)
{
    SFYDistributer distributer;  // distributer
    SFYRenderer renderer;        // renderer
    SFZRootSmp root;             // root
    SFCError error(SFERR_NO_ERROR);

    // ******************************************************************************************
    // The processing below has been implemented in the constructor of the SFYApplication class.
    // In the general applet development, there is no need to implement this.
    // ******************************************************************************************

    // initialize the distributer
    error = distributer.Initialize();
    if (error == SFERR_NO_ERROR) {

        // initialize the renderer
        // * responder space will be set to the device screen
        error = renderer.Initialize();
        if (error == SFERR_NO_ERROR) {

            // create the root
            if ((root = SFZRoot::NewInstance(&error)) != null) {

               // bind the root with the distributer
               root->SetDistributer(&distributer);

               // bind the root with the renderer
               root->SetRenderer(&renderer);

               // set the root's real region to the device screen(the responder space)
               root->SetRealBound(root->GetSuitableBound());

               // set the root's state to "visible" + "active" + "enable" + "focus" together
               root->SetState(true, true, true, true);
            }
        }
    }

    return error;
}
|
Caution |
|---|---|
Actually, SFYApplication contains the root(SFZRoot) as the root responder by default, bound with the distributer and the renderer. This processing will be performed in the SFYApplication::SFYApplication constructor. Therefore, there is no need to program the above code in almost all cases. | |
Reference: SFZRoot | SFYDistributer | SFYRenderer | SFYResponder::SetDistributer | SFYResponder::SetRenderer
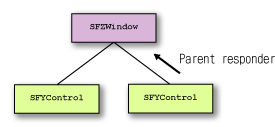
The parent responder contains the child responder in the parent-child responder relationship.
If there is a button control in a window, the parent responder of the button control is the window.
A responder with no parent responder is called "root responder", which is positioned at the top of the responder tree.
On the device screen, the parent responder is placed as GUI component more background than the child responder.
Example 9.6. Setting the parent responder
SFCError USRResponder::SetButtonParent(Void)
{
    SFZWindowSmp window;
    SFZTextButtonControlSmp button;
    SFCError error(SFERR_NO_ERROR);

    ...

    // set button's parent responder to window
    if ((error = button->SetParent(window)) == SFERR_NO_ERROR) {

        ...
    }

    return error;
}
|
Tip |
|---|---|
|
To set the parent responder to a responder, specify it in the argument of the SFYResponder::SetParent function. After this operation, the responder will be connected to the responder tree, which the parent responder belongs to. | |
Example 9.7. Clearing the parent responder
SFCError USRResponder::ClearButtonParent(Void)
{
    SFZTextButtonControlSmp button;
    SFCError error(SFERR_NO_ERROR);

    ...

    // to clear button's parent responder, set it to SFYResponderSmp::EmptyInstance()
    if ((error = button->SetParent(SFYResponderSmp::EmptyInstance())) == SFERR_NO_ERROR) {

        ...
    }

    return error;
}
|
Tip |
|---|---|
|
To clear the parent responder, specify SFYResponderSmp::EmptyInstance() in the argument of SFYResponder::SetParent function. Then, this responder will be separated from the above responder tree. | |
The child responder is contained by the parent responder in the parent-child responder relationship.
If there is a button control in a window, the child responder of the window is the button control.
On the device screen, the child responder is placed as GUI component more foreground than the parent responder.
Example 9.8. Searching the child responder
SFYResponderSmp USRResponder::SearchChild(SInt32 index) const
{
    // search "index"-th foreground child responder among visible child responders
    // besides this, there are several methods to search the specified responder
    return GetChildForward(index, true, false, false, false);
}
Reference: SFYResponder::GetChildBack | SFYResponder::GetChildFront | SFYResponder::GetChildBackward | SFYResponder::GetChildForward | SFYResponder::GetChildCount
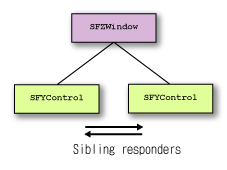
The sibling responders have the same parent responder.
On the device screen, the older sister responder is placed as GUI component more foreground than the younger sister responder.
Example 9.9. Searching the sibling responder
SFYResponderSmp USRResponder::SearchNextSister(Void) const
{
    SFYResponderSmp parent;
    SFYResponderSmp result;

    // search sibling responder next to this responder
    // among all sibling responders which have the same parent responder
    if ((parent = GetParent()) != null) {

        if ((index = GetNthBackward(false, false, false, false)) > 0) {

            result = parent->GetChildBackward(index - 1, false, false, false, false);
        }
    }

   return result;
}
Reference: SFYResponder::GetChildBackward | SFYResponder::GetChildBack | SFYResponder::GetNthBackward | SFYResponder::ToNthBackward | SFYResponder::IsNthBackward | SFYResponder::ToBack | SFYResponder::IsBack | SFYResponder::GetChildForward | SFYResponder::GetChildFront | SFYResponder::GetNthForward | SFYResponder::ToNthForward | SFYResponder::IsNthForward | SFYResponder::ToFront | SFYResponder::IsFront
The responder space is the rectangular region same with the device screen region, to draw the responder tree below the root which the SFYApplication class internally contains and is bound with the renderer.
The responder space will be automatically set to the device screen region, which is the return value of SFXGraphics::GetDeviceRectangle(), by calling the SFYRenderer::Initialize function at the initialization of renderer. And thereafter it cannot be changed.
|
Note |
|---|---|
The responder tree will not be drawn outside the responder space. | |
The real region of the root is represented as the rectangular region in the relative coordinate system of the responder space with the left-top as origin (0, 0). By default, it will be set to the responder space(device screen region).
|
Changing the responder space |
|---|---|
Though the real region of the root can be updated dynamically, the responder space is always the device screen region and cannot be changed unless the renderer is re-initialized by calling the SFYRenderer::Initialize function. | |
Reference: Method to Enlarge the Responder Space to Full Screen
The real region is the visible rectanglar region of the responder, which is represented as the rectangular region in the relative coordinate system of the local region of the parent responder with the left-top as origin (0, 0).
|
Tip |
|---|---|
To set the real region, use the SFYResponder::SetRealBound function. | |
|
Note |
|---|---|
The size of the real region is the same with that of the global region. | |
Figure 9.8. Positional relationship of the real region
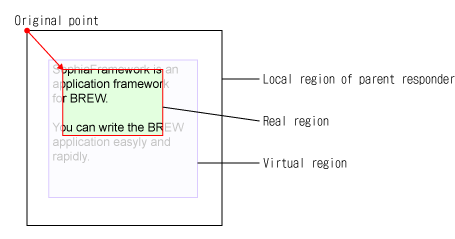
* The real region is represented as the rectangular region (SFXRectangle) in the relative coordinate system with the left-top of the local region of the parent responder as origin (0, 0).
Example 9.10. Getting and setting the suitable size for the real region
Void USRResponder::SetButtonBound(Void)
{
    SFZTextButtonControlSmp button;

    ...

    // get and set suitable size for text button control's real region
    button->SetRealBound(button->GetSuitableBound().SetOrigin(10, 10));

    ...

    return;
}
![[Warning]](images/warning.png) |
Initial value of the real region |
|---|---|
Immediately after executing the NewInstance() function, the real region is set to SFXRectangle(0, 0, 0, 0) by default. Therefore, it is necessary to set the actual real region (and local region) with the SFYResponder::SetRealBound function before placing child responders. | |
|
When the real region is reduced | ||||
|---|---|---|---|---|---|
|
When the virtual region is the same with the real region, if the real region is reduced by calling the SFYResponder::SetRealBound function, the real region will be smaller than the virtual region, since the virtual region is the same.
| |||||
The virtual region is the rectangular region of the responder, which is represented in the relative coordinate system with the left-top of the real region as origin (0, 0). The size of virtual region is the same with that of local region.
The virtual region is used to display the responder wider than the real region by scrolling itself up and down(the real region is the visible responder region).
|
Tip |
|---|---|
To set the virtual region, use the SFYResponder::SetVirtualBound function. | |
|
Note |
|---|---|
The size of the virtual region is the same with that of the local region. | |
Figure 9.9. Positional relationship between the virtual region and the real region
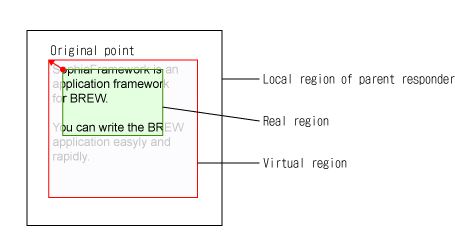
* The virtual region is represented as the rectangular region (SFXRectangle) in the relative coordinate system with the left-top of the real region as origin (0, 0).
The virtual region must include the real region. If the virtual region is not set, it equals the real region and all responder region is visible.
The local region is the rectangular region of the responder, which is represented in the relative coordinate system with the left-top of the responder region as origin (0, 0). The size of the local region is same with that of the virtual region.
Drawing the responder is performed in the local region obtained by the SFYResponder::GetLocalBound function in the drawing handler.
|
Tip |
|---|---|
To get the local region, use the SFYResponder::GetLocalBound function. | |
|
Note |
|---|---|
The size of the local region is the same with that of the virtual region. | |
Figure 9.11. Positional relationship of the local region
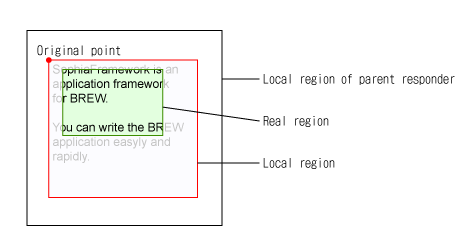
* The local region is represented as the rectangular region (SFXRectangle) in the relative coordinate system with the left-top of the responder region as origin (0, 0).
Example 9.12. Filling the local region
XANDLER_IMPLEMENT_VOIDRENDER(USRResponder, OnRenderRequest, invoker, reason, graphics)
{
    // fill local region in white color
    graphics->FillRectangle(GetLocalBound(), SFXRGBColor(0xFF, 0xFF, 0xFF, 0x00));

    return;
}
|
Initial value of the local region |
|---|---|
Immediately after executing the NewInstance() function, the local region is set to SFXRectangle(0, 0, 0, 0) by default. Therefore, it is necessary to set the actual real region (and local region) with the SFYResponder::SetRealBound function before placing child responders. | |
The global region is the rectangular region same with the real region of the responder, which is represented in the absolute coordinate system with the left-top of device screen as origin (0, 0).
|
Tip |
|---|---|
To get the global region, use the SFYResponder::GetGlobalBound function. | |
|
Note |
|---|---|
|
The global region is used when passing the rectangular region or the coordinate represented in the absolute coordinate system with the left-top of the device screen as origin (0, 0) to the standard BREW interface. The size of the global region is always the same with that of the real region. | |
Figure 9.12. Positional relationship of the global region
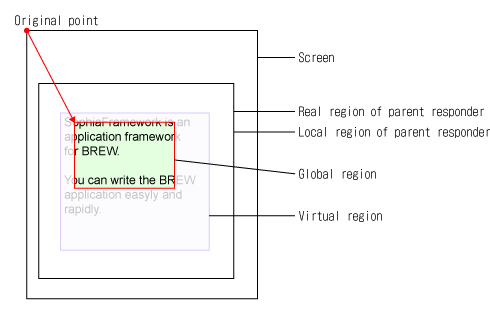
* The global region is represented as the rectangular region (SFXRectangle) in the absolute coordinate system with the left-top of the device screen as origin (0, 0).
In the responder, there is the transparency attribute which represents whether or not the background of responder is transparent.
Though the transparency attribute of the responder is by default set to "false"(non-transparent), the control responder such as a label, a radio button, or a check box is set to "true"(transparent).
If the attribute is non-transparent, the background will be filled in the color set with the SFYWidget::SetBackgroundColor function(default: white color).
Figure 9.13. Example of the transparency attribute: Text label control [SFZSingleTextLabelControl] and Check box control [SFZCheckboxControl]
![Example of the transparency attribute: Text label control [SFZSingleTextLabelControl] and Check box control [SFZCheckboxControl]](figure/sfyresponder-property-en.png)
Since the transparency attributes of the single text label control [SFZSingleTextLabelControl] and a check box control [SFZCheckboxControl] are set to "true", their backgrounds will not be drawn with the default settings like the left figure.
If the transparency attributes of these controls are set to "false", their backgrounds will be filled in white color with the default settings like the right figure.
Example 9.13. Setting the transparency attribute
Void USRResponder::SetTransparent(Void)
{

    // set USRResponder's transparency attribute to "true"
    SetPropertyTransparent(true);

    return;
}
Reference: SFYResponder::SetProperty | SFYWidget::SetBackgroundColor | SFYResponder::SetPropertyTransparent
A responder has five states with the priority order as follows:
|
Note |
|---|---|
| The valid state has the highest priority, and the focus state has the lowest priority. | |
Each state of the responder is defined in the table below.
Table 9.2. Responder's state
| Priority | Name | Value | Description |
|---|---|---|---|
| 1 | Valid state | "valid" / "invalid" |
This state represents whether or not the responder can receive an event. The state of the responder is valid if and only if it belongs to the responder tree connected with the distributer. If the SFYResponder::Terminate function is called, the valid state will become "invalid" since it will be detached from the responder tree. |
| 2 | Visible state | "visible" / "invisible" |
This state represents whether or not the responder is visible. When the responder is placed outside the real region of the parent responder or completely hidden behind other responders, drawing speed may improve by setting the visible state to "invisible". |
| 3 | Active state | "active" / "inactive" |
This state represents whether or not the responder can be the target of operation. When the active state is set to "inactive", the color of label text or frame line may become lighter or darker, or the 3D looking responder may become 2-dimensional. The active state has effect only on the appearance of responder. |
| 4 | Enable state | "enable" / "disable" |
This state represents whether or not the focus can be moved to the responder(i.e., the responder is enabled). Different from the active state, the appearance of responder is the same whether the enable state is set to "enable" or not. When the enable state is set to "disable", the responder will not be focused (or operated). |
| 5 | Focus state | "focus" / "unfocus" |
This state represents whether or not the responder is the target of current operation(i.e the responder is focused). When the focus state is set to "focus", the focus frame showing this state may be drawn. At most one responder can be focused among sibling responders. If the focus is moved to another enabled responder, the focus state of previously focused responder will be set to "unfocus" automatically. If the focused responder is terminated and there are enabled sibling responders other than this responder, the focus will be moved to next younger enabled sister responder. If there is no younger enabled sister responder, the focus will be moved to next older enabled sister responder. If the focused responder is unfocused by setting the focus flag to "false", no sibling responder will be focused. |
|
Initial state of the responder |
|---|---|
|
Immediately after the responder is created with the NewInstance() function, the initial states are set as follows:
| |
|
Caution |
|---|---|
|
After the valid state flag becomes "false" by calling the SFYResponder::Terminate function, the responder must not be reinitialized by calling the SFYResponder::Initialize function. Any event must not be sent to an invalid responder(i.e., the valid state flag is false). For instance, a responder must not send an event to itself in the destructor since the valid state flag is "false" in the destructor. | |
Figure 9.14. Example of 5 states: Text button control [SFZTextButtonControl]
![Example of 5 states: Text button control []](figure/new-responder/element-state-en.png)
Text button control [SFZTextButtonControl] will change visually depending on the states.
Figure 9.15. Example of 5 states(Expanded figure): Text button control [SFZTextButtonControl]
![Example of 5 states(Expanded figure): Text button control [SFZTextButtonControl]](figure/new-responder/element-state-ex.png)
Depending on the states, some elements of the text button control [SFZTextButtonControl] may change the color and other elements may be displayed or not.
|
Elements of the text button control |
|---|---|
| |
Reference: SFYButtonControl | SFZTextButtonControl | SFXBevelColor
Example 9.14. Setting the state of the responder
Void USRResponder::SetState(Void)
{
    // set the USRResponder's state to "visible" + "active" + "enable" + "focus" together
    SetState(true, true, true, true);

    // set the visible state flag to "false"
    // * at this time, the values of the active and  enable state flags are still "true",
    //   however, only the focus state flag will be automatically changed from "true" to "false"
    SetStateVisible(false);

    // when the visible state flag is set to "true" again,
    // the value of the focus state flag is still "false"
    SetStateVisible(true);

    // in order to make USRResponder focused again,
    // you have to set the focus state flag to "true" explicitly as below
    SetStateFocus(true);

    return;
}
Even if the visible, active, enable, or focus state of the responder is set to "true", the responder does not always behave like that.
If the responder behaves like the state flag, the state is said to be "ON" Otherwise it is said to be "OFF".
For instance, even if the visible flag is set to "true", the visible state is said to be "OFF" when the responder is not drawn. On the contrary, the visible state is said to be "ON" when it is actually drawn.
The state of the responder is "ON" if and only if all the following 3 conditions are satisfied. Otherwise it is "OFF".
|
Note |
|---|---|
| There is the priority in each state in the order of "valid", "visible", "active", "enable", and "focus". | |
The flag value or the ON/OFF value of each state of the responder can be obtained by calling the SFYResponder::GetStateVisible / SFYResponder::GetStateActive / SFYResponder::GetStateEnable / SFYResponder::GetStateFocus functions with the "inherit" argument.
|
ON/OFF of the state |
|---|---|
| |
|
Handling the state event |
|---|---|
|
The state event will occur when the state changes between ON and OFF. By registering the handler for the state event, necessary processing can be performed. | |
Reference: SFYResponder::Initialize | SFYResponder::Terminate | SFYResponder::SetState | SFYResponder::SetStateVisible | SFYResponder::SetStateActive | SFYResponder::SetStateEnable | SFYResponder::SetStateFocus
The event(SFXEvent) consists of an event type( BREW API AEEEvent type) and two parameters(P16 parameter and P32 parameter).
The handler to handle an event is registered into the responder / the SFYDistributer instance of the root(SFZRoot) with the SFYResponder::RegisterHandler / SFYDistributer::RegisterHandler function.
There are three types of events as follows:
The event type name of the BREW-defined event has the SF prefix.
For instance, the SFEVT_KEY event(key event[SFEVT_KEY]) is the BREW-defined event.
On the other hand, the event type name of the responder-defined event has the SFEVT_RESPONDER_ prefix.
For instance, the SFEVT_RESPONDER_RENDER event(drawing event) is the responder-defined event.
From a point of view of dispatching an event, there are two types of events as follows:
The event of the distribute type is distributed to the responders with the SFYResponder::Distribute function, according to the dispatching rule of the tracer. Then, the corresponding handler will be booted up in the responder receiveing the event. The BREW-defined event is of the distribute type.
The event of the callback type will be sent to the responder by calling the SFYResponder::InvokeForward / SFYResponder::InvokeBackward function. Then, the corresponding handler will be booted up in the responder receiveing the event. The responder-defined event is of the callback type.
|
User-defined event |
|---|---|
|
The event type of the user-defined event which you can define as your own event is in the range from SFEVT_USER_CLASS_BEGIN(0x8000) to SFEVT_USER_CLASS_END(0xFFFE). Since the default dispatching rule for the user-defined event is not registered, it will be distributed to no responder as the event of the distribute type even if the handler is registered. To distribute the user-defined event as the event of the distribute type, you have to register the dispatching rule into the tracer. | |
Reference: Event Handling | Event List
The event loop is the repeated processing that the BREW-defined event occurred in the BREW environment is distributed to the appropriate responders according to the tracer rule and the corresponding handlers are executed.
For more details, see Event Handling.
The distributer is the algorithm(SFYDistributer) to distribute an event to the responder tree.
First of all, the distributer(SFYDistributer) receives the event dispatched from the BREW environment.
Then, it distributes the event to the appropriate responders in the responder trees according to the dispatching rules of the tracer.
The responder(or the distributer) which receives the event calls the corresponding handler to perform the event handling.
One distibuter needs to be set to the root responder with the SFYResponder::SetDistributer.
|
Note |
|---|---|
Since setting the distributer has been performed in the SFYApplication::SFYApplication constructor, it is unnecessary in the development of the applet which uses the application class inheriting from the SFYApplication class. | |
The renderer is the algorithm(SFYRenderer) to draw the responder tree in the responder space.
When the SFYResponder::Render function is called, the renderer will be booted up and send the drawing event to the responders which needs to be redrawn.
The responder which receives the drawing event calls the drawing handler to perform the rendering.
One renderer needs to be set to the root responder with the SFYResponder::SetRenderer.
|
Note |
|---|---|
Since setting the renderer has been performed in the SFYApplication::SFYApplication constructor, it is unnecessary in the development of the applet which uses the application class inheriting from the SFYApplication class. | |
The dispatching rule for the event of the distribute type is registered into the tracer managed by the SFYTracer class.
The SFYResponder::RegisterTracer / SFYDistributer::RegisterTracer function is used to register the dispatching rule for an event into the tracer of the responder or the SFYDistributer instance bound with the root(SFZRoot).
There are three elements below in each dispatching rule registered into the tracer (Reference: Standard Tracer).
Distributing condition. Specify the responder's state which the event is distributed to.
Processing order. Specify the calling order of handlers.
Overloading condition. Specify whether or not to handle the event duplicately.
If more than one dispatching rule for the same event are registered into the tracer, the event will be distributed based on the last registered dispatching rule.
|
Type of the event registered into the tracer |
|---|---|
The event registered into the tracer must be of the distribute type. You must not register the dispatching rule for the event of the callback type into the tracer. | |
|
Event of the distribute type |
|---|---|
An event to distribute with the SFYResponder::Distribute function is defined as the event of the distribute type. For instance, the BREW-defined event is of the distribute type. | |
|
Event of the callback type |
|---|---|
An event to send with the SFYResponder::InvokeForward / SFYResponder::InvokeBackward function is defined as the event of the callback type. For instance, the responder-defined event is of the callback type. | |
Reference: Standard Tracer | Event
Example 9.15. Registering the dispatching rule into the tracer
SFCError USRResponder::MakeTracer(Void)
{

    // for the key events from AVK_SOFT1 to AVK_SOFT4
    // register the dispatching rule of "processing order: from foreground to background, distributing condition:all states, overloading condition:None"
    // into the tracer
    return RegisterTracer(
        SFXEventRange(SFEVT_KEY, SFEVT_KEY, AVK_SOFT1, AVK_SOFT4),
        SFYTracer::ORDER_FORWARD, SFYTracer::STATE_ALL, false
    );
}
The handler managed by the SFYHandler class is the function to handle an event.
The SFYResponder::RegisterHandler / SFYDistributer::RegisterHandler function is used to register the handler for an event into the responder or the SFYDistributer instance bound with the root(SFZRoot).
It is possible to register more than one handler for the same event. At this time, handlers are called in the registered order or vice versa. If the event is handled by the handler, whether or not to boot up the next handler as long as it exists depends on the settings.
Example 9.16. Registering the handler function
SFCError error;

register one handler at a time
error = RegisterHandler(SFXEventRange(SFEVT_KEY, SFEVT_KEY, SFP16_BEGIN, SFP16_END),
                        XANDLER_INTERNAL(OnKey)
        );


register more than one handler at a time together
static SFXEventRange::AtomRecConst range[] = {
    {             SFEVT_KEY,              SFEVT_KEY,          SFP16_BEGIN,            SFP16_END},
    {       SFEVT_KEY_PRESS,        SFEVT_KEY_PRESS,          SFP16_BEGIN,            SFP16_END},
    {     SFEVT_KEY_RELEASE,      SFEVT_KEY_RELEASE,          SFP16_BEGIN,            SFP16_END}
};
SFYHandler::RuleRec rule[lengthof(range)];

rule[0].spp = XANDLER_FUNCTION(OnKey);
rule[0].reference = this;
rule[1].spp = XANDLER_FUNCTION(OnKeyPress);
rule[1].reference = this;
rule[2].spp = XANDLER_FUNCTION(OnKeyRelease);
rule[2].reference = this;

error = RegisterHandler(atomic_cast(range), rule, lengthof(range));
The tracer list is the list of the dispatching rules of the tracer. It is of the stack type (i.e., the top of the list is foremost and the bottom of the list is backmost) and managed by the SFYTracer class.
If the dispatching rule is registered into the responder newly, it will be pushed down on the top of the tracer list. On the other hand, if the dispatching rule with the specified condition is unregisreted from the responder, it will be popped up from the top of the tracer list searching from the top of the tracer list.
|
Note |
|---|---|
| Each responder instance has one tracer list. | |
The handler list is the list of the handlers(handler functions). It is of the stack type (i.e., the top of the list is foremost and the bottom of the list is backmost) and managed by the SFYHandler class.
If the handler function is registered into the responder newly, it will be pushed down on the top of the handler list. On the other hand, if the handler function with the specified condition is unregisreted from the responder, it will be popped up from the top of the handler list searching from the top of the handler list.
There are two methods to traverse the handler list when calling the handler function: from the top(foremost) to the bottom(backmost) of the handler list and vice versa.
|
Note |
|---|---|
| Each responder instance has one handler list. | |
The distribute type is the method to boot up the corresponding handler using the distributer.
Concretely, the distributer distributes an event to the appropriate responders and boots up the corresponding handler by referring to dispatching rules registered into the tracer.
|
Tip |
|---|---|
BREW-defined event is distributed by the distribute type. | |
|
Caution |
|---|---|
The event of the distribute type can be distributed to the child responders of the target responder using the dispatching rule registered into the tracer. | |
The callback type is the method to send an event with the SFYResponder::InvokeForward function or the SFYResponder::InvokeBackward function and boot up the corresponding handler.
To call the foremost handler first from the handler list, use the SFYResponder::InvokeForward function. Otherwise, use the SFYResponder::InvokeBackward function.
In the SFYResponder::InvokeForward / SFYResponder::InvokeBackward function, it is necessary to specify in the "overload" argument indicating whether or not to handle the event duplicately.
|
Tip |
|---|---|
Responder-defined event is sent by the callback type. | |
|
CAUTION |
|---|---|
The event of the callback type is handled only inside the target responder(it will be sent to no child responder). | |
|
Sending an event in the destructor |
|---|---|
Since the valid state is "invalid" just before executing the destructor, no event must be sent to itself in the destructor(the behaviour is not defined in this case). | |
The type is the 4-character identifier (4-byte) which needs to be defined for each responder class, set as the 4-character literal with the four_char_code macro in the constructor, and will not be changed hereafter.
Type is set with the SFYResponder::SetType function.
Default: Type of the parent responder.
As shown in the example code below, the concrete responder class can be determined by referring to the value of the responder type via the pointer to the abstract responder class with the SFYResponder::GetType function.
|
CAUTION |
|---|---|
|
The type needs to be set in the constructor immediately after the responder instance is created newly. The 4-character literals which consist of the small alphabet or symbol are reserved for SophiaFramework UNIVERSE. In general, the 4-character literals of the capital alphabet should be used in the applet development. Reference: Type List | |
Example 9.17. Setting the type
// constructor
USRResponder::USRResponder(Void) static_throws
{
    if (static_try()) {

        // type must be set here
        // with this setting,
        // parent class type is set when error occurs in the parent class's constructor,
        // while this class type is set when error occurs in this constructor
        // therefore easy to determine where error occurs in using this class externally
        SetType(four_char_code('U', 'R', 'S', 'P'));

        // here describe the initialization
        ...
    }
}
Example 9.18. Referring to the type
Void USRResponder::PrintType(SFYResponderSmpConstRef param) const
{
    switch (param->GetType()) {

        case SFZWindow::CODE_TYPE:

            TRACE("It is the SFZWindow class.");

            break;

        case SFZDialog::CODE_TYPE:

            TRACE("It is the SFZDialog class.");

            break;

        case SFZTextButtonControl::CODE_TYPE:

            TRACE("It is the SFZTextButtonControl class.");

            break;

        default:

            TRACE("It is an unknown class.");

            break;
    }

    return;
}
The ID is the 4-byte value which can be set to each responder freely as the identifier.
The responder can be searched by specifying its ID.
The developer can set any ID of the UInt32(Unsigned 32-bit Integer) type to the responder with the SFYResponder::SetID function, and get the ID with the SFYResponder::GetID function.
Default: 0.
* If no ID is set for the responder explicitly, its ID is regarded as 0. Therefore, the 4-byte value other than 0 is recommended for ID.
|
Tip |
|---|---|
| The same ID can be set for more than one responder, and the responder's ID can be changed dynamically. | |
Example 9.19. Setting ID
SFCError USRResponder::MakeButton(Void)
{
    SFZTextButtonControlSmp button;
    SFCError error(SFERR_NO_ERROR);

    if ((button = SFZTextButtonControl::NewInstance(&error)) != null) {

        if ((error = button->SetParent(GetThis())) == SFERR_NO_ERROR) {

            // set the ID of the text button control to 100
            button->SetID(100);
            ...
        }
    }

    return error;
}
Example 9.20. Searching the responder with ID
SFZTextButtonControlSmp USRResponder::GetButton(Void) const
{
    // if ID is used, the developer don't have to manage the responders with the class variables

    // get the text button control whose ID is "100"
    return static_pointer_cast<SFZTextButtonControl>(GetChildFront(100));
}
The reference is the 4-byte value of the VoidPtr type, which can be used to identify the responder.
The developer can set any 4-byte value to the responder as the reference with the SFYResponder::SetReference function, and get the reference with the SFYResponder::GetReference function.
Default: null.
Example 9.21. Setting the reference value as an identification number to text button control and getting it
SFZTextButtonControlSmp _button;
SInt32 i;

// make 10 text button controls and set references(identification numbers) to them
for (i = 0; i < 10; ++i) {

    // create the text button control
    if ((_button = SFZTextButtonControl::NewInstance(&error)) != null) {

        // set the text button control's parent responder to GetThis()
        error = _button->SetParent(GetThis());
        if (error == SFERR_NO_ERROR) {

            // set the reference value as the identification number to the text button control
            _button->SetReference(reinterpret_cast<VoidPtr>(i));
        }
    }
}

...

// get text button control's reference
SInt32 number = reinterpret_cast<SInt32>(_button->GetReference());
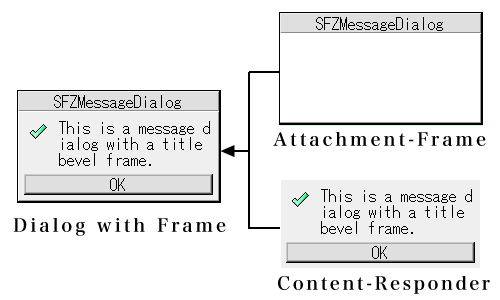
With the SFYResponder::SetFrame function, a frame can be attached to a responder. At this time, the frame which is attached to the responder is called as the "attachment-frame". And, the responder to which the frame is attached is called as the "content-responder".
To check whether or not a responder is an attachment-frame / a content-responder, call the SFYResponder::IsFrame / SFYResponder::HasFrame function respectively.
The instance(Frame) of the class inheriting from SFYFrame is a candidate for attachment-frame.
On the other hand, three kinds of responders below are candidates for content-responder:
Figure 9.16. Attachment-Frame and Content-Responder
The main characteristics of the attachment-frame and the content-responder are as follows:
Real Region of the Attachment-Frame and the Content-Responder
If the real region of the content-responder is set with the SFYResponder::SetRealBound function, that of the corresponding attachment-frame will be automatically set to the region obtained by inflating it by the frame margin. Processing equivalent to the above will be also performed inside the SFYResponder::SetFrame function.
On the other hand, by setting the real region of the attachment-frame with the SFYResponder::SetRealBound function, that of the content-responder will be internally set to the region obtained by deflating it by the frame margin.
|
Frame Margin |
|---|---|
|
The frame magin for drawing a outer frame or/and a title can be obtained with the SFYResponder::GetSuitableMargin function. The SFYResponder::GetSuitableMargin function is effective only for the instance(Frame) of the class inheriting from SFYFrame. Since calculation of the frame magin is performed internally, it will be a rare chance that this function is used explicitly. | |
Attachment-Frame in the Responder Tree
No parent responder can be set to the attachment-frame explicitly with the SFYResponder::SetParent function.
From the point of the view of the responder tree, it should be noted that handling of the attachment-frame which is attached to a responder will differ from other responders in the following points.
The attachment-frame will be internally managed so as to have the same parent responder with the content-responder. In other words, it will be internally managed so that the attachment-frame and the content-responder are the sibling responders.
Concretely, when a parent responder is set to the content-responder, the attachment-frame is managed so as to be always the direct younger sister responder of the corresponding content-responder. And the real region of the attachment-frame is the region obtained by expanding that of the corresponding content-responder by the frame margin. As a result, the attachment-frame will be rendered as the frame of the corresponding content-responder.
On the other hand, from the point of view of the state and the distributer, the attachment-frame behaves as the child responder of the corresponding content-responder.
That is to say, the the attachment-frame inherits the states from the corresponding content-responder. For instance, if the visible state of the content-responder is changed from ON to OFF, that of the corresponding attachment-frame will be changed from ON to OFF. (*)
|
Caution |
|---|---|
| (*) It is assumed that all the state flags of the attachment-frame are set to "true". | |
The events received by the content-responder will be distributed to the corresponding attachment-frame by using the rules registered into the tracer on the premise that the attachment-frame is the first child responder of the corresponding content-responder.
|
Caution |
|---|---|
| Since there exists neither real parent-child nor sibling relationship between the attachment-frame and the content-responder, any parent child event[SFEVT_RESPONDER_OWNER] will not occur between both of them. | |
Transparency of the Attachment-Frame
The attachment-frame is handled transparently as follows
If the real region of the content-responder is set, that of the corresponding attachment-frame will be automatically set to the region obtained by inflating it by the frame margin.
The attachment-frame cannot be obtained with the functions such as SFYResponder::GetChildFront. And the attachment-frame will not be included in the counting of the child responders with the SFYResponder::GetChildCount function.
If the function such as SFYResponder::ToFront function is called so that the position of the attachment-frame among the sibling responders may be changed, nothing will happen. Both of the content-responder and the corresponding attachment-frame will not be moved as they are.
On the contrary, if it is called so that the position of the content-responder among the sister responders may be changed, the content-responder will be moved together with the corresponding attachment-frame. The attachment-frame is internally managed so as to be always the direct younger sister responder of the corresponding content-responder.
If the content-responder is closed with the SFYResponder::Terminate function, the corresponding attachment-frame will be detached from it, become invisible, and restore to the normal frame which can be attached to other responder.
If the attachment-frame is closed, only the attachment-frame will be detached from the content-responder and become invisible. This operation will not influence the corresonding content-responder.
|
Copyright(c) 2002 - 2024 Sophia Cradle Incorporated All Rights Reserved. |
|